
I was introduced to star trail photography back in November. I had seen it before but never gave it any thought and didn't even really connect what it was. I stumbled about a website that explained the process and immediately became intrigued and decided I would try it for myself while on my road trip out west. Star Trail photography can be tricky, and by that, I mean that just about no 2 websites has the same information on shutter speed, aperture, ISO, etc. To make matters even more complicated, there are different methods entirely depending on if you are using film or digital (film method can be used with digital). Not to fret, I will cover both and explain the pros and cons of each.
Gear
- Camera with the ability to use Bulb mode
- Stable tripod
- Remote release cable (100% required)
- Something to keep you entertained while you wait (Not required, but you will be glad you brought it)
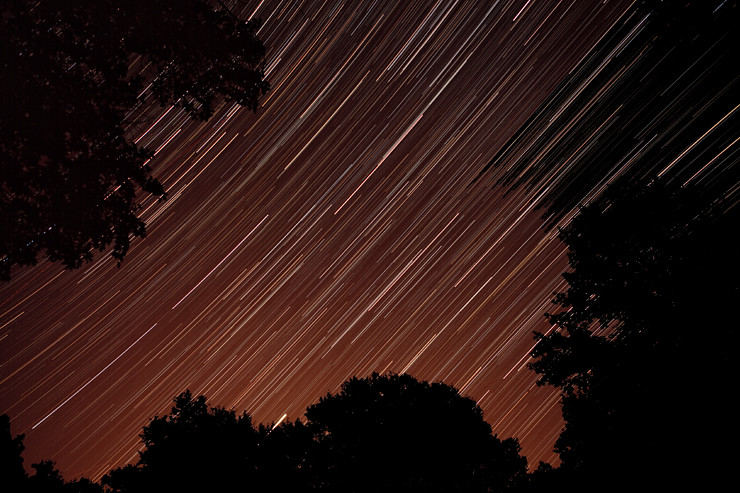
So you have your gear and the weather is looking perfect. Now you have to figure out your composition. You could just point the camera straight up and have nothing but stars, or you could go the more original route and try to get a foreground subject in the photo.The later is a bit harder to accomplish, but it worth the effort, even if the foreground subject isn't all that exciting. If you want to go the route of adding a foreground subject, you have to figure out lighting. This is actually a case where having some moonlight can be a good thing, but don't go overboard. I'd try to steer clear of anything over a half moon, and try to be a slightly closer to a new moon. That moonlight might just be enough to light your foreground subject. If you're lucky, it is enough or at the very least give some definition to the subject. Any lights you have to offer can help. LED flashlights do a surprisingly good job at mimicking daylight, and if your subject is close enough and you are in a place you can do it, turn on your car headlights. Last, but not least, is how you want your trails to look. As you may, or may not, know, the north star is near perfectly directly over the north pole. Because of this, the star always appears to be in the exact same place at all times. So what does this mean when shooting star trails? Well the farther you get away from the north star in you image, the longer, and more circular, the trails become. Depending on the framing, the trails can either become full circles with the north star in the center or expanding arches with the north star in a corner. If you decide not to include the north star, the trails can do some cool things like trailing in different and opposite directions. Now with all that, it is time to put the camera to work and figuring out exactly what setting to use.
This is where you decide which method you want to go with. Both methods can be used on digital, but the digital method is exclusively on digital.I'll also point out the the digital method is the preferred when shooting digital, but does have a few more steps involved and could run into more problems while shooting, but I will get into that later.
Film Method
This is the simplest method to shooting star trails. All you do is turn your camera on Bulb mode, plug in your cable release and set it and forget it. Put the ISO as low as possible. This means either 100-200 and make sure not to go any higher or there will be too much noise to be able to work with the photo at all. Focusing can be a problem. The most absolute and sure fire way to get both the foreground subject and stars in focus is to determine the hyper focal distance of your lens. Very difficult to do for zoom lenses, but a piece of cake for prime lenses. Just go to http://www.dofmaster.com/ and pick one of the many methods they have there to determine the hyper focal distance for your lens. In a nutshell, the hyper focal distance allows from everything halfway between your subject to infinity to be in focus. Only problem is it's not a very easy technique to put into practice. Another method a lot of landscape photographers use is to focus at about 1/3rd into your scene. Easier to pull off, but not exact, but can prove to be much better than just focusing on your subject. With that said, focusing on your subject isn't forbidden, your star trails just won't be as sharp but you may prefer them that way. Most importantly when focusing, TURN AUTO FOCUS OFF WHEN YOU ACHIEVE YOUR FOCUS!!! Nothing more heart braking to attain that perfect focus only to see it vanish when you press the shutter button when you take the shot.
Now with focusing done with, you are going to have to experiment at this point. For your aperture, f/4 is a good place to start with, but you are going to have experiment a bit. For quicker shots and shorter trails, you can get away with f/2.8 to get more light in short time. For longer shots with long trails go no higher than f/8. The problem here is that depending on the light situation for where you are, this part is always different. The moon, light pollution, etc. can all affect what aperture you are going to need. With all that, it's time to take the picture... and wait. Put the shutter lock on the cable release and wait however long you want the shot to be. 15 minutes is a good minimum to start getting interesting trails, but you can let the camera go for hours. Just make sure to turn on your camera's noise reducing dark frame. The camera takes another shot with the shutter closed for the same length to compare images and remove noise and hot pixels. Helpful, but it doesn't get rid of everything. Just make sure your batteries can handle the time it takes to take the photo as well as the noise reducing shot. If your camera dies, the image is gone for good.
This method is good to use when you only want to deal with a single image. The downsides though are that you are going to get a lot of noise, even shooting at 100 ISO, and if you do end up losing power, you just wasted a lot of time. This method is easier and when first trying out star trails, this helps you figure things out, however I find the digital method is a much better choice and offers much higher quality photos.
Digital Method
This method only works on digital cameras and is the preferred method when using a digital camera.
EDIT: One important factor to mention is lens fogging. This happens particularly when it is cold outside. Because of the metal of the camera and lens, the camera can become colder than it is outside. This causes the moisture in the air around the lens to fog it up. To get around this, you can either rubber band some hand warmers around the lens or get some nice wool socks to put around the lens.
When shooting digital, you are going to do things a bit differently. This time you are going to shoot in manual and set the shutter speed to 30 seconds and switch the firing mode to burst mode. This is going to allows the camera to continuously take shots for the as long as you want. Now if you have no foreground subject, feel free to shoot at f/2.8, however, if you do have a subject, you are going to have to play with the aperture and ISO. Because each shot is only 30 seconds, you can't rely on the moon lighting to have as big of a role when shooting in bulb. This is where external light such a car can really come in handy. A second, and much more practical way about this is to have a single image exposed for your subject and use that image in Photoshop to put it in your finished star trails photo. After you have obtained the proper focus and set the shutter speed, you'll have to find the right aperture/ISO mix. I'd start by picking the f/ you think you will need for your subject and then start testing for the proper ISO. A good way to go about this is to set the shutter speed to 4 seconds (exactly 3 stops down from 30 seconds) and put the ISO to 800 (exactly 3 steps up from 100 ISO). This allows you to take test shots faster. keep moving the ISO up until you find what works, and when you do, put the shutter speed back to 30 seconds and lower the ISO by 3 stops (most camera dials adjust by 1/3rd stop, so to get right ISO for 30 seconds, just lower the ISO by rotating the dial 9 times).
Everything should now be set and good to go. Shutter speed set to 30 seconds, burst mode is on, your desired aperture and the correct ISO to go along with it, and you are focused. TURN OFF AUTO FOCUS!!! This time you will not be needing the in camera noise reduction extra shot as you will be taking many short shots. Lock the shutter on the cable release and you can now shoot until the memory card is full with no worry about the batteries dying and losing your image. Of course, still make sure your batteries are charged. You don't won't them to die after a handful of shots. Next step in the process is in post.
When it comes to shooting in either RAW or JPEG, I always prefer RAW. You can perfect the white balance as well as perform many other photo disaster problems as well as making sure that every image is identical in as many ways as possible because you are going to need every image to be perfect. But RAW means larger files and if you don't have the card space, you have no choice but to use JPEG. If that's the case, make sure you set the white balance to anything but auto. Test out which white balance works best, but either tungsten or fluorescent are going to work best and the perfect the WB in post. Wether shooting in RAW or editing a JPEG, make sure you apply the changes to every image. Once the images are ready, you are going to use the star trails photoshop action which can be found at http://www.schursastrophotography.com/software/photoshop/startrails.html. This action will take all the images and blend them into 1 combined image with all the stars now connected into trails. Don't expect to see results immediately. The more images you have the longer it takes, so have a book handy. With the image flattened, you can then go about doing any more post you feel needs to be done.
Film Vs. Digital
The decision between which method to use is pretty simple. If you are shooting digital, use the digital method. It has few more steps and the post process is a bit longer, but you will be much happier with the results. You can also make different length trails by either using more or less of the photos. You can also use the same images as a time lapse photo of the stars actually moving across the sky which is also really cool. The film method is easier and not quite as time consuming, but you are going get a lot of noise in your image. I do suggest trying both, and when first starting out, you get to see the results sooner.
Hope this tutorial has been helpful and gets some of you to give it a try. You can really get some cool shots out of it. Let me know if there are any questions, any areas that need more work or anything that needs more explaining.
